

Image via Wikipedia
Now that you have several blog posts published, it’s time to think about organizing your blog. An organized blog makes it easy for your readers to find the type of story they are looking for. And it can help you, too, by giving you ideas about what to write. (Whichever category has the fewest things in it, that’s a good one for your next post!)
But first, let’s warm up our brains with some editing practice…
Editing Practice
We’re not spending much time with our book these days, but it still has a few good reminders for us. For instance, check out these helpful lists…
- Transition words, page 42.
- Descriptive words, pages 64-66.
- Nouns, page 73.
- Verbs, page 97.
Can you write a sentence using at least 5 words from these lists? Turn it into a funny blog post!
Categories for Your Blog
Blog categories are a short list of the major types of articles you write. As our small blogs grow, categories are the first type of organization we add.
You can see my categories near the top of my far-right sidebar. Most of my posts will fall into the Blogging Tips or Class Notes categories, but I also write about a scattering of other topics. And I added a Miscellaneous category to catch things like contests or giveaways that don’t fit anywhere else. That way, none of my posts are left as Uncategorized orphans.
 Ideally, each post will belong to just one category. In real life, there is usually overlap. This post, for instance, is filed under Class Notes and also under Blogging Tips – Intermediate, which is a “child” category. When a category gets too big, you can form subcategories, called children. So Blogging Tips is split into Beginner, Intermediate, and Seasoned Blogger.
To the Computers
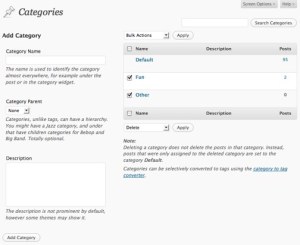
To add categories to your blog:
- Make a list of the 2-5 types of posts you write most often. You can add more categories later, as you need them.
- On your Dashboard, go to Posts > Categories and type in the new category’s name. If you want to make it a child category, click the down arrow and select the parent it will be filed under. Click Add New Category.
- On that page, you can also edit or delete any of your categories.
Then go to Appearance > Widgets and add a categories widget to your sidebar.
Finally, go to Posts and click Quick Edit for each of your published posts. Check the box next to the category that fits. Remember to click Update to save your changes!
Homework
For your homework this week:
- Finish making your categories. Make sure every blog post has a category to call home. Don’t leave any Uncategorized orphans!
- Our end-of-semester Culmination Party is coming soon. Have you chosen which blog post you want to highlight on our class display? Let me know!
- Are there any classmates’ blogs that you haven’t visited yet? Drop by and leave them an encouraging comment.
“Extra Credit”: Blog Carnival and More
It’s almost time for the next Homeschool Kids Blog Carnival! Pick out your favorite blog post, and then click here to fill out the submission form.
Finally, if you have extra time, be sure to check out the next Student Blogging Challenge. Or go back to last week’s challenge and try the Count Out Three Game….


November 8th, 2010 at 10:16 pm
TeacherMom,
I hope you don’t mind, but this week’s student blogging challenge was going to be about tags and categories, so I will be sending the students here to learn about categories from your great post.
Why re-invent the wheel when you have already written the post?
November 9th, 2010 at 5:18 am
[…] Visit Teacher Mom who runs a homeschool blogging course and read her post about categories. Follow her instructions […]
November 9th, 2010 at 10:10 am
Hi, Miss W. and all the blogging challenge students! I’m glad you found my post helpful.
My instructions about which buttons to click are specifically for WordPress.com, but the method should be similar on whatever blogging platform you use.
The main steps you need are:
(1) Name your categories.
(2) Apply these labels to your old posts.
(3) Put a categories widget in your sidebar, so all your readers can find it.
And then, of course, you need to remember to apply a category to each new post you write, to make it easy for readers to find, too!